Posts

Showing posts from May, 2019

How to Prepare for MySQL Certification Exam

Image
How to Prepare for MySQL Certification Exam Here I am going to suggest MySQL DBA, student or any newbie that how they can prepare for "Oracle's MySQL 5.x Database Administrator" certification exam.  Step 1: Lab -- Prepare your local MySQL lab environment and make sure to install the respective MySQL version on your lab. (i.e., if you are going to appear on MySQL 5.6 DBA exam 1Z0-883 then install MySQL 5.6 on your lab)  -- You can follow my below blog post to create your local MySQL lab environment.  How to create CentOS VM using Vagrant Install MySQL on CentOS using DBdeployer Step 2: Book + HandsOn Experience -- If you don't have below book, then go right now and purchase this book. (Here Please, you don't judge that below-suggested book is for 5.0 version whereas you are going to prepare for MySQL 5.6/5.7 DBA certification exam. Just go ahead and purchase below book. In the end, you will definitely say it was your

Install MySQL on CentOS using DBdeployer

Image
Install MySQL on CentOS using DBdeployer 1. Here It is assumed You will have a CentOS system/VM. If not, then please find my this blog post link where you will get instruction about, how you can create CentOS virtual machine using the vagrant.  2. Connect to CentOS VM abhinavs-MacBook-Air:centos7-test-vm agupta$ pwd /Users/agupta/vagrant_box/centos7-test-vm abhinavs-MacBook-Air:centos7-test-vm agupta$ vagrant ssh  [vagrant@centos7-test-vm ~]$ sudo su - [root@centos7-test-vm ~]# 3. Run below command to install the latest DBdeployer package  [root@centos7-test-vm ~]# yum -y install wget [root@centos7-test-vm ~]# VERSION=1.30.0 [root@centos7-test-vm ~]# OS=linux [root@centos7-test-vm ~]# origin=https://github.com/datacharmer/dbdeployer/releases/download/v$VERSION [root@centos7-test-vm ~]# wget $origin/dbdeployer-$VERSION.$OS.tar.gz [root@centos7-test-vm ~]# tar -xzf dbdeployer-$VERSION.$OS.tar.gz [root@centos7-t

errno: 24 - Too many open files

Image
errno: 24 - Too many open files You might see this error inside MySQL's error log file or during mysql_upgrade operation. Can't open file: ‘./db/table.frm' (errno: 24 - Too many open files) To solve this issue, you will need to change the open files limit at system and db service level. --> To check and change this limit at the system level, we use ulimit client tool to set it dynamically. * Check current system open file limit. root@test:~# ulimit -a core file size          (blocks, -c) 0 data seg size           (kbytes, -d) unlimited scheduling priority             (-e) 0 file size               (blocks, -f) unlimited pending signals                 (-i) 515256 max locked memory       (kbytes, -l) 64 max memory size         (kbytes, -m) unlimited open files                      (-n) 1024 pipe size            (512 bytes, -p) 8 POSIX message queues     (bytes, -q) 819200 real-time priority              (-r) 0 stack size     

ERROR 1040 (HY000): Too many connections

Image
ERROR 1040 (HY000): Too many connections An application might face this issue when all the defined max_connections parameter value is exhausted.  mysqld reserve a  +1 connection (i.e., max_connections + 1) for the user who is having the SUPER privilege.  When this issue appears, Only the user with the SUPER privileges can be connected if any other user who has SUPER privileges is not already connected to the database and we have reached max_connections.  1. Always make sure to DON'T give the SUPER privilege to any application user or any user which is being used inside the scripts. Because if that user has already been connected to db when "too many connections" issue appears, then that time root user can't be connected even though root user is having all privileges along with SUPER privileges.  Here I am presenting 3 cases which will help us, how MySQL handles "too many connections" and reserve 1 connection. For below example,

File/Pos Replication : Skip Slave's sql_thread error [COMMAND]

File/Pos Replication : Skip Slave's sql_thread error [COMMAND] For binlog file & position based replication setup, To skip the slave's sql_thread error, run below command. stop slave;  set global sql_slave_skip_counter=1; start slave; select sleep(3); show slave status\G

set --server-id to enable either a master or a slave

set --server-id to enable either a master or a slave Below issue can be faced, when we run CHANGE MASTER command to setup replication. mysql> change master to master_host='xx.xx.xx.xx',master_user='rep_user',master_password="xxxxxxx", master_log_file='db-01-test-bin.000064',master_log_pos=95854072,master_auto_position=0; ERROR 1794 (HY000): Slave is not configured or failed to initialize properly. You must at least set --server-id to enable either a master or a slave. Additional error messages can be found in the MySQL error log. Solution :- Here It is assumed, We have already set server-id parameter value different on master and slave node but still, we have the above error. It happens once, you performed the server packages upgrade(like from 5.6 to 5.7) and just started MySQL service and going to run CHANGE MASTER command. So, to solve this issue, Run mysql_upgrade command to update/upgrade system tables and then restart M

Thumb rule to choose Percona-Server ssl Linux-Generic package

Image
Thumb rule to choose Percona-Server ssl Linux-Generic package Here below are my thumb rules to choose which ssl linux-generic package, you should download for your system. Like here we can see if we need to download Percona-Server Linux-Generic package then We can see here we have couple of packages available with different ssl(100/101/102) versions. https://www.percona.com/downloads/Percona-Server-5.7/LATEST/binary/tarball/ Here you should choose below package based on your operating system. Debian prior to 9 and Ubuntu prior to 14.04 versions --> ssl100 CentOS 6 and CentOS 7 --> ssl101 Debian 9 and Ubuntu versions starting from 14.04 --> ssl102 Photo by  James Sutton  on  Unsplash

ProxySQL/Orchestrator/Replication/PMM

Image
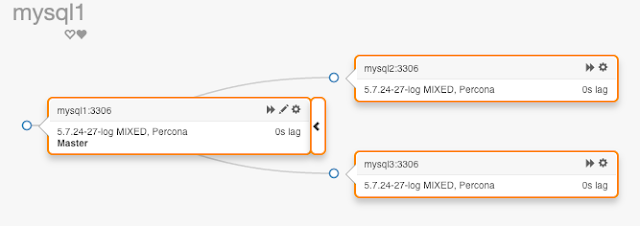
PORP LAB : ProxySQL/Orchestrator/Replication/PMM Summary PORP Lab will create 4 different nodes. Each node will have below packages/applications/db installed. app -- Percona Server 5.7 -- Percona Toolkit -- Percona XtraBackup -- Sysbench -- ProxySQL -- Orchestrator -- PMM mysql1 / mysql2 / mysql3 -- Percona Server 5.7 -- Percona Toolkit -- pmm-client -- Replication PORP LAB have ProxySQL,Orchestrator and PMM properly configured, we can just create this lab and use it. Install VirtualBox Version 5.2.22 or Later Install Vagrant Version 2.2.2 or Later Install Vagrant plugin hostmanager vagrant plugin install vagrant-hostmanager Update Vagrant Plugin vagrant plugin update Clone the repo git clone https://github.com/abhinavbit/PORP-LAB.git Create Lab vagrant up --provision Connect to each node vagrant ssh app vagrant ssh mysql1 vagrant ssh mysql2 vagrant ssh mysql3 Verify Replication vagrrant ssh mysql2 mysql -e " show s

How to create CentOS VM using Vagrant

Image
Create CentOS VM using Vagrant 1. Download and install the latest Oracle VM VirtualBox.  https://www.oracle.com/technetwork/server-storage/virtualbox/downloads/index.html Like (For Mac OS X) https://download.oracle.com/virtualbox/6.0.6/VirtualBox-6.0.6-130049-OSX.dmg 2. Download and install the latest Vagrant. https://www.vagrantup.com/downloads.html Like (For Mac OS X) https://releases.hashicorp.com/vagrant/2.2.4/vagrant_2.2.4_x86_64.dmg 3. Download " centos /7" Vagrant Box using below command. abhinavs -Air : ~ agupta$ vagrant box add centos /7 ==> box: Loading metadata for box ' centos /7'      box : URL: https://vagrantcloud.com/centos/7 This box can work with multiple providers! The providers that it can work with are listed below. Please review the list and choose the provider you will be working with. 1) hyperv 2) libvirt 3) virtualbox 4) vmware_desktop Enter your choice: 3 ==> box: Addin